Uploads & Storage
The storage and upload functionality is currently experimental.
While we believe this feature will be included in the framework the interface is currently subject to significant change. Breaking changes will be made in minor and patch releases until the feature is released as stable after which normal SemVer rules will apply.
We'd love to hear any feedback you might have on our community forum.
Getting started with file uploads can open up a world of possibilities for your application. Whether you're enhancing user profiles with custom avatars, allowing document sharing, or enabling image galleries - Redwood has an integrated way of uploading files and storing them.
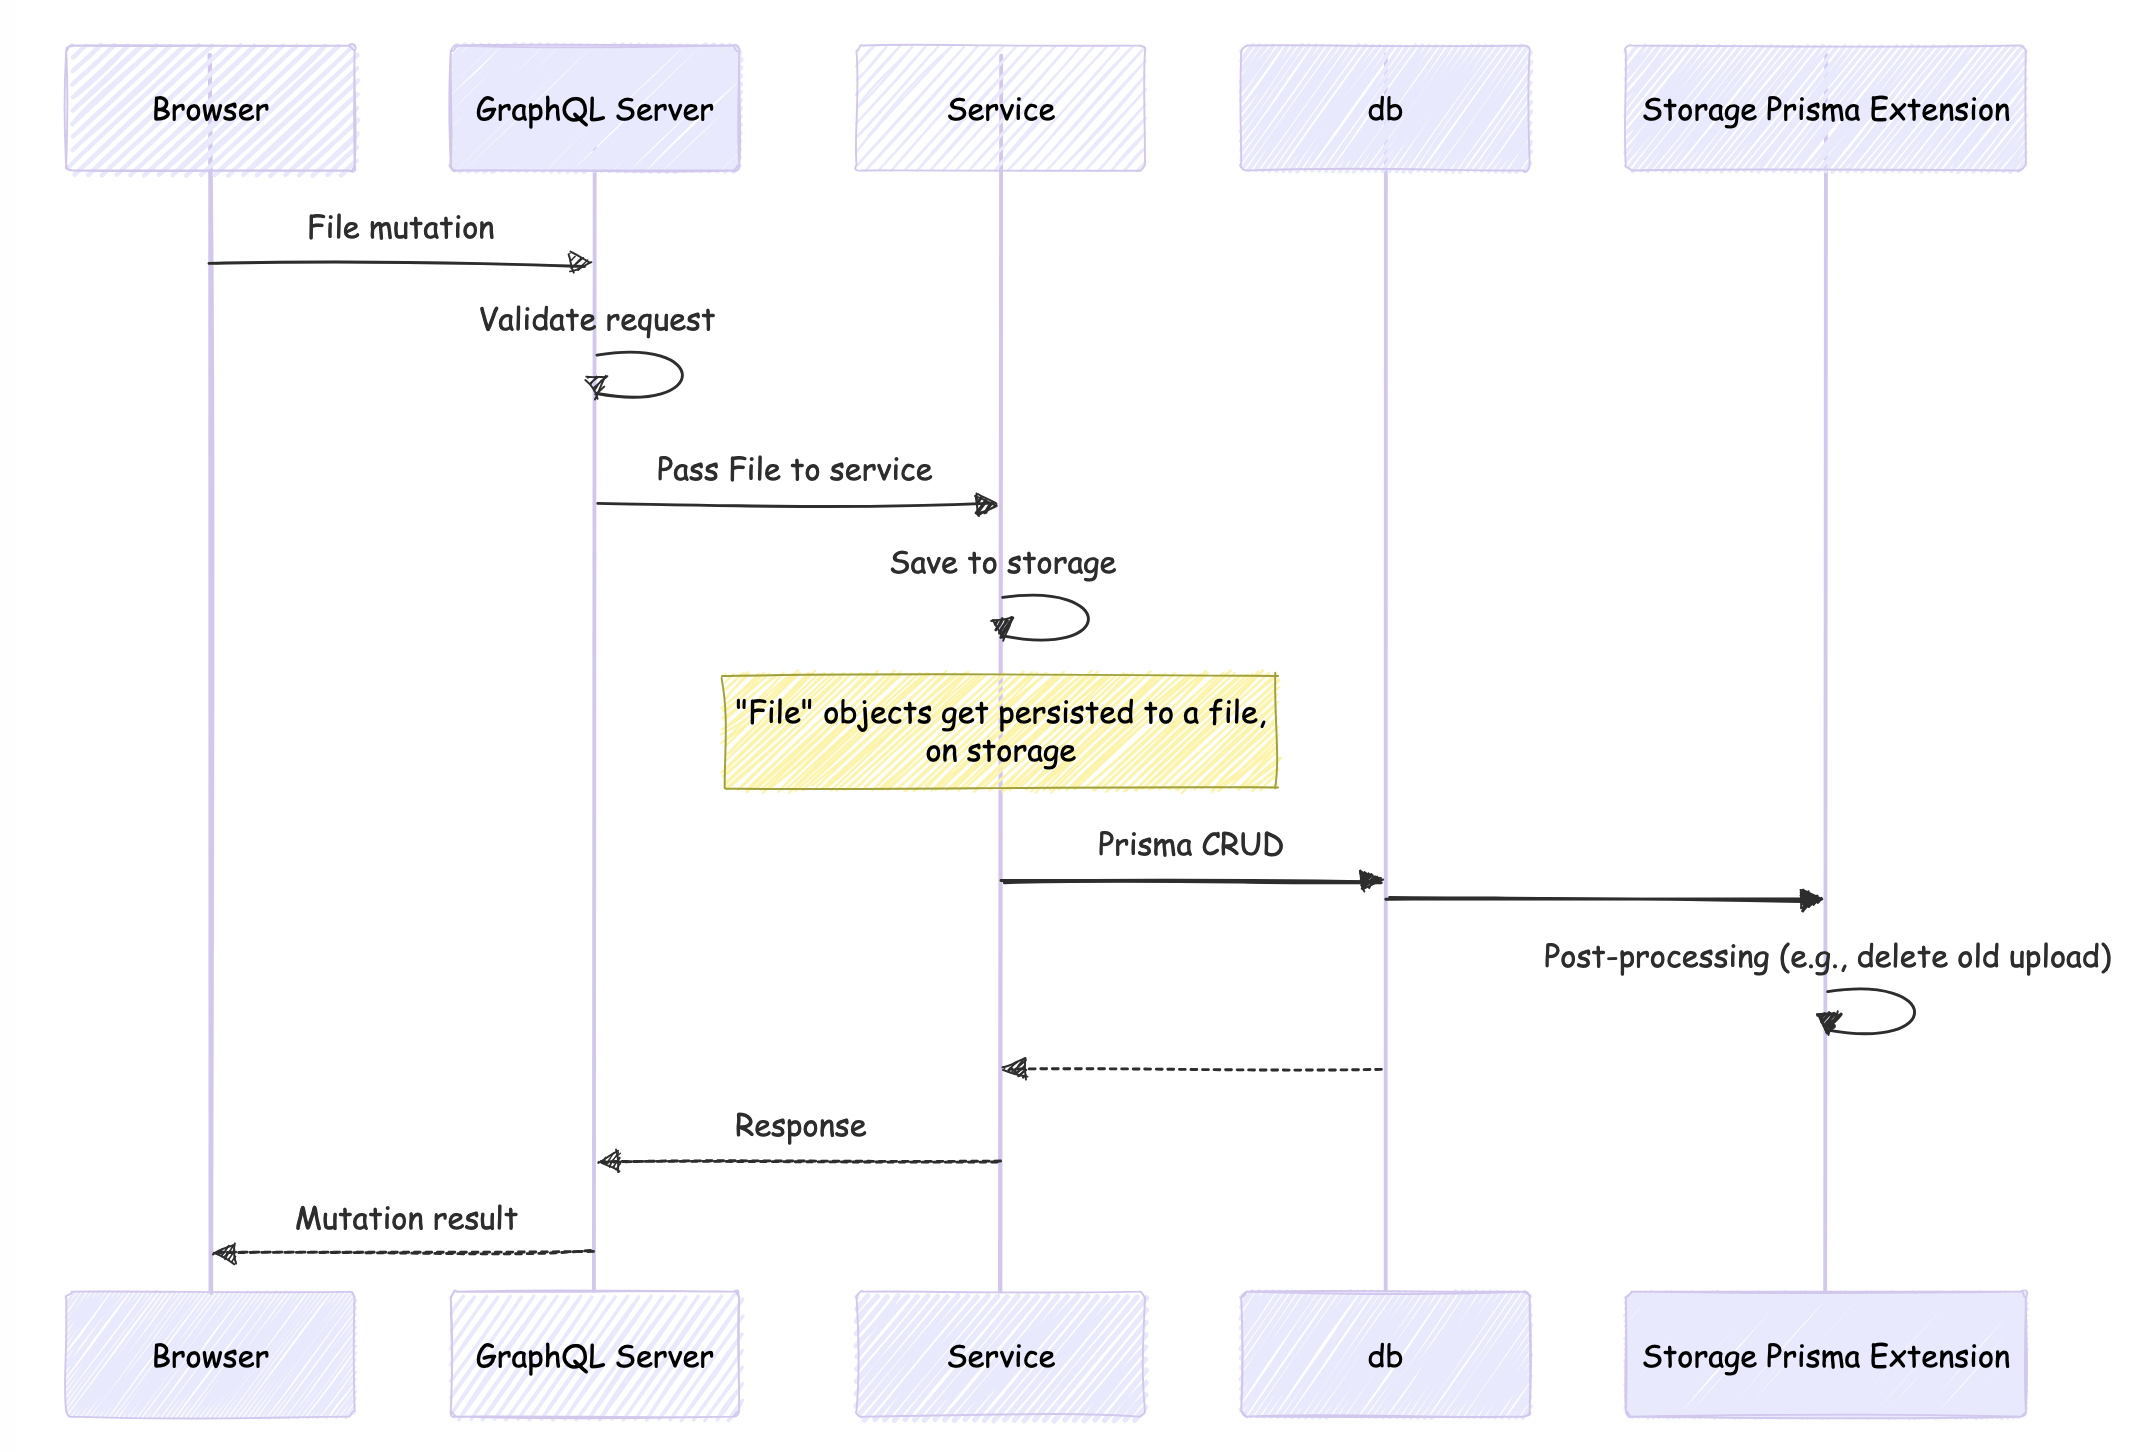
There are two parts to this:
- Setting up the frontend and GraphQL schema to send and receive files - Uploads
- Manipulate the data inside services, and pass it to Prisma, for persistence - Storage
We can roughly breakdown the flow as follows
Uploading Files
1. Setting up the File scalar
Before we start sending files via GraphQL we need to tell Redwood how to handle them. Redwood and GraphQL Yoga are pre-configured to handle the File scalar.
In your mutations, use the File scalar for the fields where you are submitting an upload
input UpdateProfileInput {
  id: Int
  firstName: String
  # ...other fields
  avatar: File
}
You're now ready to receive files!
2. Configuring the UI
Assuming you've built a Form for your profile let's add a
FileField to it.
import { FileField, TextField, FieldError } from '@redwoodjs/forms'

export const ProfileForm = ({ onSubmit }) => {
  return {
    <Form onSubmit={onSubmit}>
      <Label name="firstName" /*...*/ >
        First name
      </Label>
      <TextField name="firstName" /*...*/ />
      <FieldError name="firstName"  />

      <Label name="lastName" /*...*/ >
        Last name
      </Label>
      <TextField name="lastName" /*...*/ />
      <FieldError name="lastName"  />

      <FileField name="avatar" /*...*/ />
    </Form>
  }
}
A FileField is just a standard <input type="file"> - that's integrated with your Form context - it just makes it easier to extract the data for submission.
Now we need to send the file as a mutation!
import { useMutation } from '@redwoodjs/web'

const UPDATE_PROFILE_MUTATION = gql`
  // This is the Input type we setup with File earlier!
  mutation UpdateProfileMutation($input: UpdateProfileInput!) {
    updateProfile(input: $input) {
      firstName
      lastName
      avatar
    }
  }
`

const EditProfile = ({ profile }) => {
  const [updateProfile, { loading, error }] = useMutation(
    UPDATE_PROFILE_MUTATION,
    {
      /*..*/
    }
  )

  const onSave = (formData: UpdateProfileInput) => {
    // We have to extract the first file from the input

    const input = {
      ...formData,
      // FileField returns an array, we want the first and only file; Multi-file
      // uploads are available
      avatar: formData.avatar?.[0],
    }

    updateProfile({ variables: { input } })
  }

  return (
    <ProfileForm
      profile={profile}
      onSave={onSave}
      error={error}
      loading={loading}
    />
  )
}
While multi-file uploads are possible, when our example form is submitted we process the data to ensure the avatar field contains a single file instead of an array (because that's how we setup the UpdateProfileInput). The onSave function then calls the updateProfile mutation. The mutation automatically handles the file upload because we've set up the File scalar and configured our backend to process file inputs.
3. Logging the Item Details
Try uploading your avatar photo now, and if you log the avatar field in your service:
export const updateProfile = async ({ id, input }) => {
  console.log(input.avatar)
  // File {
  //   filename: 'profile-picture.jpg',
  //   mimetype: 'image/jpeg',
  //   createReadStream: [Function: createReadStream]
  //  ...
  // }

  // Example without using the built-in helpers
  await fs.writeFile(
    '/test/profile.jpg',
    Buffer.from(await input.avatar.arrayBuffer())
  )
}
You'll see that you are receiving an instance of File.
That's part 1 done - you can receive uploaded files. In the next steps, we'll talk about some tooling and a Prisma client extension that Redwood gives you, to help you persist and manage your uploads.
What's happening behind the scenes?
Once you send the request, and open up your Network Inspect Panel, you'll notice that the graphql request looks slightly different - it has a different Content-Type (instead of the regular application/json).
That's because when you send a File - the Redwood Apollo client will switch the request to a multipart form request, using GraphQL Multipart Request Spec. This is the case whether you send a File, FileList or Blob (which is a less specialized File).
On the backend, GraphQL Yoga is pre-configured to handle multipart form requests, as long as you specify the File scalar in your SDL.
Storage
Great, now you can receive Files from GraphQL - but how do you go about saving them to disk, while also tracking them in your database? Well, Redwood has the answers for you! Keep going to find out how!
1. Configuring the Prisma schema
In your Prisma schema, the avatar field should be defined as a string:
model Profile {
  id: Int
  // ... other fields
  avatar String?
}
This is because Prisma doesn't have a native File type. Instead, we store the file path or URL as a string in the database. The actual file processing and storage will be handled in your service layer, and then the path to the uploaded file is passed to Prisma to save.
2. Configuring the Upload savers and Uploads extension
To make it easier (and more consistent) dealing with file uploads, Redwood gives you a standardized way of saving your uploads (i.e. write to storage) by using what we call "savers," along with our custom Uploads extension that will handle deletion and updates automatically for you.
The rest of the doc assumes you are running a "Serverful" configuration for your deployments, as it involves the file system.
Let's first run the setup command:
yarn rw setup uploads
This will do three things:
- Generate a configuration file in
api/src/lib/uploads.ts - Configure your Prisma client with the storage extension
- Generate a
signedUrlfunction
Let's break down the key components of the configuration.
import { createUploadsConfig, setupStorage } from '@redwoodjs/storage'
import { FileSystemStorage } from '@redwoodjs/storage/FileSystemStorage'
import { UrlSigner } from '@redwoodjs/storage/signedUrl'

// ⭐ (1)
const uploadConfig = createUploadsConfig({
  profile: {
    fields: ['avatar'], // 👈 the fields that will contain your `File`s
  },
})

// ⭐ (2)
export const fsStorage = new FileSystemStorage({
  baseDir: './uploads',
})

// ⭐ (3) Optional
export const urlSigner = new UrlSigner({
  secret: process.env.UPLOADS_SECRET,
  endpoint: '/signedUrl',
})

// ⭐ (4)
const { saveFiles, storagePrismaExtension } = setupStorage({
  uploadsConfig,
  storageAdapter: fsStorage,
  urlSigner,
})

export { saveFiles, storagePrismaExtension }
1. Upload Configuration
This is where you configure the fields that will receive uploads. In our case, it's the profile.avatar field.
The shape of the config looks like this:
[prismaModel] : {
   fields: ['modelField1']
 }
2. Storage Adapter
We create a storage adapter, in this case FileSystemStorage, that will save your uploads to the ./uploads folder.
This just sets the base path. The actual filenames and folders are determined by the saveFiles utility functions, but can be overridden!
3. Url Signer instance
This is an optional class that will help you generate signed urls for your files, so you can limit access to these files. Generate a secret with yarn rw g secret and add to your .env as UPLOADS_SECRET.
4. Utility Functions We provide utility functions that can be exported from this file to be used elsewhere, such as services.
saveFiles- object containing functions to save File objects to storage, and return a path. For example:
saveFiles.forProfile(gqlInput)
storagePrismaExtension- The Prisma client extension we'll use inapi/src/lib/db.tsto automatically handle updates, deletion of uploaded files (including when the Prisma operation fails). It also configures Result extensions, to give you utilities likeprofile.withSignedUrl().
3. Attaching the Uploads extension
Now we need to extend our db client in api/src/lib/db.ts to use the configured prisma client.
import { PrismaClient } from '@prisma/client'

import { emitLogLevels, handlePrismaLogging } from '@redwoodjs/api/logger'

import { logger } from './logger'
import { storagePrismaExtension } from './uploads'

// 👇 Notice here we create prisma client, but don't export it yet
const prismaClient = new PrismaClient({
  log: emitLogLevels(['info', 'warn', 'error']),
})

handlePrismaLogging({
  db: prismaClient,
  logger,
  logLevels: ['info', 'warn', 'error'],
})

// 👇 Export db after adding uploads extension
export const db = prismaClient.$extends(storagePrismaExtension)
The $extends method is used to extend the functionality of your Prisma client by adding
- Query extensions which will intercept your
create,update,deleteoperations - Result extensions for your stored files - which gives you helper methods on the result of your prisma query
More details on these extensions can be found here.
Why Export This Way
The $extends method returns a new instance of the Prisma client with the extensions applied. By exporting this new instance as db, you ensure that any additional functionality provided by the uploads extension is available throughout your application, without needing to change where you import.
Note one of the limitations of using extensions is if you have to use $on on your prisma client (as we do in handlePrismaLogging), it needs to happen before you use $extends
4. Implementing Upload savers
You'll also need a way to actually save the incoming File object to a file persisted on storage. In your services, you can use the pre-configured "savers" to write your File objects to storage. Prisma will automatically save the path into the database. The savers and storage adapters, configured in api/src/lib/uploads, determine where the file is saved.
import { saveFiles } from 'src/lib/uploads'

export const updateProfile: MutationResolvers['updateProfile'] = async ({
  id,
  input,
}) => {
  const processedInput = await saveFiles.forProfile(input)

  // input.avatar (File) becomes a path string 👇
  // Settings in src/lib/uploads.ts configures where the upload is saved
  // processedInput.avatar -> '/mySavePath/profile/avatar/generatedId.jpg'

  return db.profile.update({
    data: processedInput,
    where: { id },
  })
}
For each of the models you configured when you setup uploads (in UploadConfig) - you have savers for them.
So if you passed:
const uploadConfig = createUploadsConfig({
  profile: {
    fields: ['avatar'],
  },
  anotherModel: {
    fields: ['document'],
  },
})

const { saveFiles } = setupStorage(uploadConfig)

// Available methods 👇
saveFiles.forProfile(profileGqlInput)
saveFiles.forAnotherModel(anotherModelGqlInput)

// Special case - not mapped to prisma model
saveFiles.inList(arrayOfFiles)
You might have already noticed that the saver functions sort-of tie your GraphQL inputs to your Prisma model.
In essence, these utility functions expect to take an object very similar to the Prisma data argument (the data you're passing to your create, update), but with File objects at fields avatar, and document instead of strings.
If your File is in a different key (or a key you did not configure in the upload config), it will be ignored and left as-is.
Informational/Utilities
Storage Prisma Extension
This Prisma extension is designed to handle file uploads and deletions in conjunction with database operations. The goal here is for you as the developer to not have to think too much in terms of files, rather just as Prisma operations. The extension ensures that file uploads are properly managed alongside database operations, preventing orphaned files and maintaining consistency between the database and the storage.
The extension will only operate on fields and models configured in your UploadConfig which you configure in api/src/lib/uploads.ts.
What this configures is:
A) CRUD operations
- when the record is deleted, the associated upload is removed from storage
- when a record is updated, the associated upload file is also replaced
...and negative cases such as:
- saved uploads are removed if creation fails
- saved uploads are removed if update fails (while keeping the original)
create & createMany operations
If your create operation fails, it removes any uploaded files to avoid orphaned files (so you can retry the request)
update & updateMany operations
- If update operation is successful, removes the old uploaded files
- If it fails, removes any newly uploaded files (so you can retry the request)
delete operations
Removes any associated uploaded files, once delete operation completes.
upsert operations
Depending on whether it's updating or creating, performs the same actions as create or update.
Result Extensions
When you add the storage prisma extension, it also configures your prisma objects to have special helper methods.
These will only appear on fields that you configure in your UploadConfig.
const profile = await db.profile.update(/*...*/)

// The result of your prisma query contains the helpers
profile?.withSignedUrl() // ✅

// Incorrect: you need to await the result of your prisma query first!
db.profile.update(/*...*/).withSignedUrl() // 🛑

// Assuming the comment model does not have an upload field
// the helper won't appear
db.comment.findMany(/*..*/).withSignedUrl() // 🛑
B) Result extensions
export const profile = async ({ id }) => {
  // 👇 await the result from your prisma query
  const profile = await db.profile.findUnique({
    where: { id },
  })

  // Convert the avatar field (which was persisted as a path) to data uri string
  return profile?.withDataUri()
}
It's very important to note limitations around what Prisma extensions can do:
a) The CRUD operation extensions will not run on nested read and write operations
For example:
const savedFiles = saveFiles.inList(input.files)

db.folder.update({
  data: {
    ...input,
    files: {
      createMany: {
        data: savedFiles, // if the createMany fails, the saved files will _not_ be deleted
      },
    },
  },
  where: { id },
})
b) Result extensions are not available on relations.
You can often rewrite the query in a different way though. For example, when looking up files :
const filesViaRelation = await db.folder
  .findUnique({ where: { id: root?.id } })
  .files()

const filesWhereQuery = await db.file.findMany({
  where: {
    folderId: root?.id,
  },
})

// 🛑 Will not work, because files accessed via relation
return filesViaRelation.map((file) => file.withSignedUrl())

// ✅ OK, because direct lookup
return filesWhereQuery.map((file) => file.withSignedUrl())
Saving File lists - saveFiles.inList()
If you would like to upload FileLists (or an arrays of Files), use this special utility to persist your Files to storage. This is necessary because String arrays aren't supported on databases - you probably want to save them to a different table, or specific fields.
Let's say you define in your SDL, a way to send an Array of files.
input UpdateAlbumInput {
  name: String
  photos: [File]
}
You can use the .inList function like this:
export const updateAlbum = async ({
  id,
  input,
}) => {

  // notice we're passing in the file list, and not the input!
  const processedInput = await saveFiles.inList(input.photos)
  /* Returns an array like this:
  [
    '/baseStoragePath/AG1258019MAFGK.jpg',
    '/baseStoragePath/BG1059149NAKKE.jpg',
  ]
  */

  const mappedPhotos = processedInput.map((path) => ({ path }))
  /* Will make `mappedPhotos` be an array of objects like this:
  [
    { path: '/baseStoragePath/AG1258019MAFGK.jpg' },
    { path: '/baseStoragePath/BG1059149NAKKE.jpg' },
  ]
  */

  return db.album.update({
    data: {
      ...input,
      photo: {
        createMany: {
          data: mappedPhotos,
        },
      },
    },
    where: { id },
  })
Customizing save file name or save path
If you'd like to customize the filename that a saver will write to you can override it when calling it. For example, you could name your files by the User's id
await saveFiles.forProfile(data, {
  fileName: 'profilePhoto-' + context.currentUser.id,
})

// Will save files to
// /base_path/profilePhoto-58xx4ruv41f8eit0y25.png
If you'd like to customize where files are saved, perhaps you want to put it in a specific folder, so you can make those files publicly available, you can override the folder to use too (skipping the base path of your Storage adapter):
await saveFiles.forProfile(data, {
  fileName: 'profilePhoto-' + context.currentUser.id,
  path: '/public_avatar',
})

// Will save files to
// /public_avatar/profilePhoto-58xx4ruv41f8eit0y25.png
The extension is determined by the name of the uploaded file.
Signed URLs
When you setup uploads, we also generate an API function (an endpoint) for you - by default at /signedUrl. You can use this in conjunction with the .withSignedUrl helper. For example:
import { EXPIRES_IN } from '@redwoodjs/storage/UrlSigner'

export const profile = async ({ id }) => {
  const profile = await db.profile.findUnique({
    where: { id },
  })

  // Convert the avatar field to signed URLs
  return profile?.withSignedUrl({
    expiresIn: EXPIRES_IN.days(2),
  })
}
The object being returned will look like:
{
  id: 125,
  avatar: '/.redwood/functions/signedUrl?s=s1gnatur3&expiry=1725190749613&path=path.png'
}
This will generate a URL that will expire in 2 days (from the point of query). Let's breakdown the URL:
| URL Component | |
|---|---|
/.redwood/functions/signedUrl | Point to the API server, and the endpoint configured |
s=s1gnatur3 | The signature that we'll validate |
expiry=1725190749613 | Time stamp for when it expires |
path=path.png | The key to look up the file on your storage |
How the signedUrl function validates
This function is automatically generated for you, but let's take a quick look at how it works:
import type { SignatureValidationArgs } from '@redwoodjs/storage/UrlSigner'

// The urlSigner and fsStorage instances were configured when we setup uploads
import { urlSigner, fsStorage } from 'src/lib/uploads'

export const handler = async (event) => {
  // Validate the signature using the urlSigner instance
  const fileToReturn = urlSigner.validateSignature(
    // Pass the params {s, path, expiry}
    event.queryStringParameters as SignatureValidationArgs
  )

  // Use the returned value to lookup the file in your storage
  const { contents, type } = await fsStorage.read(fileToReturn)

  return {
    statusCode: 200,
    headers: {
      // You also get the type from the read
      'Content-Type': type,
    },
    // Return the contents of the file
    body: contents,
  }
}
We created and exported the urlSigner instance and fsStorage adapter in src/lib/uploads.
The details to validate come through as query parameters, which we pass to the urlSigner.validateSignature parameter.
If it's valid, you will receive a path (or key) to the file - which you can then lookup in your storage.
The read function also returns the mime-type of the file (based on the extension) - which you pass as a response header. This ensures that browsers know how to read your response!
Data URIs
When you have smaller files, you can choose instead to return a Base64 DataURI string that you can render directly into your html.
export const profile = async ({ id }) => {
  const profile = await db.profile.findUnique({
    where: { id },
  })

  return profile?.withDataUri()
}
The withDataUri extension is an async function. Remember to await, if you are doing additional manipulation before returning your result object from the service.
The output of withDataUri would be your profile object, with the upload fields transformed into a data uri. For example:
{
  // other fields
  id: 12355,
  name: 'Danny'
  email: '...'
  // Because configured avatar as an upload field:
  avatar: 'data:image/png;base64,iVBORw0KGgoAAAANSUhEUgAAJ/...Q0MgUHJvZmlsZQAAKJF1kL='
}
Storage Adapters
Storage adapters are crucial for abstracting the underlying storage mechanism, allowing for flexibility in how files are managed. The BaseStorageAdapter defines a standard interface for all storage adapters, and looks like this:
export abstract class BaseStorageAdapter {
  adapterOpts: AdapterOptions
  constructor(adapterOpts: AdapterOptions) {
    this.adapterOpts = adapterOpts
  }

  getAdapterOptions() {
    return this.adapterOpts
  }

  generateFileNameWithExtension(
    saveOpts: SaveOptionsOverride | undefined,
    file: File
  ) {
    /** We give you an easy way to generate file names **/
  }

  abstract save(
    file: File,
    saveOpts?: SaveOptionsOverride
  ): Promise<AdapterResult>

  abstract remove(fileLocation: AdapterResult['location']): Promise<void>

  abstract read(fileLocation: AdapterResult['location']): Promise<{
    contents: Buffer | string
    type: ReturnType<typeof mime.lookup>
  }>
}
Types of Storage Adapters MemoryStorage: This adapter stores files in memory, making it ideal for temporary storage needs or testing scenarios. It offers faster access times but does not persist data across application restarts.
We build in two storage adapters:
- FileSystemStorage - This adapter interacts with the file system, enabling the storage of files on disk.
- MemoryStorage - this adapter stores files in memory, making it ideal for temporary storage needs or testing scenarios. It offers faster access times but does not persist data across application restarts.
Configuring the server further
Sometimes, you may need more control over how the Redwood API server behaves. This could include customizing the body limit for requests, redirects, or implementing additional logic - that's exactly what the Server File is for!
Making a folder public
While you can always create a function to access certain files publicly, similar to the /signedUrl function that gets generated for you - another way could be to configure the API server with the fastify-static plugin to make a specific folder publicly accessible.
import path from 'path'
import fastifyStatic from '@fastify/static'

import { createServer } from '@redwoodjs/api-server'
import { logger } from 'src/lib/logger'

async function main() {
  const server = await createServer({
    logger,
  })

  server.register(fastifyStatic, {
    root: path.join(process.cwd() + '/uploads/public_profile_photos'),
    prefix: '/public_uploads',
  })

  await server.start()
}

main()
Based on the above, you'll be able to access your files at:
http://localhost:8910/.redwood/functions/public_uploads/01J6AF89Y89WTWZF12DRC72Q2A.jpeg
OR directly
http://localhost:8911/public_uploads/01J6AF89Y89WTWZF12DRC72Q2A.jpeg
Where you are only exposing part of your uploads directory publicly
In your web side code you can construct the URL like this:
const publicUrl = `${global.RWJS_API_URL}/${profile.avatar.replace(
  'uploads/public_profile_photos/',
  'public_uploads/'
)}`
Customizing the body limit for requests
The default body size limit for the Redwood API server is 100MB (per request). Depending on the sizes of files you're uploading, especially in the case of multiple files, you may receive errors like this:
{
  "code": "FST_ERR_CTP_BODY_TOO_LARGE",
  "error": "Payload Too Large",
  "message": "Request body is too large"
}
You can configure the bodyLimit option to increase or decrease the default limit.
import { createServer } from '@redwoodjs/api-server'

import { logger } from 'src/lib/logger'

async function main() {
  const server = await createServer({
    logger,
    fastifyServerOptions: {
      bodyLimit: 1024 * 1024 * 500, // 500MB
    },
  })

  await server.start()
}

main()